The performance of pneumatic tools has a significant impact on a company’s bottom line. Damien Feller, global product marketing manager for spares and solutions at Chicago Pneumatic, discusses how to maximise performance.

Pneumatic tools are mechanical systems comprising air motors, wear parts and other elements that need regular inspection and changes. This is to make sure they are kept in excellent working condition, providing consistent high performance, and preserving their specifications, for example power and speed.
Maintenance
There are several checks to include as part of a preventive maintenance regime, in which simple, regular and foreseeable actions are taken to reduce the risk of tool failure. For example, in pneumatic grinders, the parts that wear most frequently and need regular maintenance are:
- Blades – inspection is recommended every 500 hours
- Bevel gears (angle grinders and sanders only) – maintenance interval is specified as every 1000 to 2000 hours depending on the tools.
Information relating to proper maintenance is available in the tool’s operator manual.

The air line and accessories set-up
Having reviewed the mechanical components, it is vital to check the quality and pressure of the air supply. It is important that the air is clean and lubricated, so using a filter regulator lubricator (FRL) will optimise tool performance and lifespan. A pneumatic tool’s motor needs two things to work properly and at maximum speed: dynamic air pressure of 90 psi/6.3 bar at the tool inlet, and air flow as recommended by the tool manufacturer. Without the correct pressure and flow, the tool’s motor will not have enough energy to run at full speed, resulting in suboptimal efficiency.
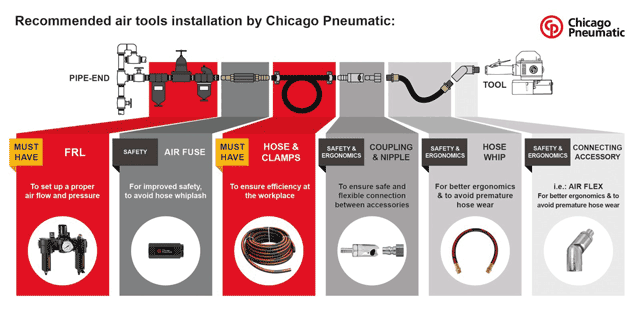
The choice of air line accessories (such as air fuse, hose, couplings and FRL) and their set-up is critical to a tool’s performance. Each accessory from the FRL to the tool inlet should be selected considering air inlet size, air inlet type, maximum air consumption at load and recommended hose diameter and length. By double-checking these, a tool’s efficiency can be maximised. To be sure accessories fit the tool perfectly and provide the best performance level, always refer to the tool manufacturer’s recommendations.
To make sure the air line is supplying the right pressure, there are three simple steps to take:
- Calculate whether there is an air pressure drop between the FRL and the tool. In the air tool installation, most of the pressure drop occurs between the pipe-end (see diagram) and the tool. The pressure at the tool inlet should not be less than the manufacturer’s recommendations.
- If it is, identify where pressure is being lost by checking that the accessories have been selected and installed properly. There are various points to inspect, the main ones being: at the tool inlet, the couplings/nipples, hose connections and the FRL.
- When all the accessories have been selected and installed correctly, measure the dynamic pressure at the tool inlet once more. The FRL regulator can then finally be adjusted so the system reads 90 psi/6.3 bar at the tool inlet.
Calibration is key
Calibrating is another consideration for making sure a tool is performing at its best. A tool’s performance typically tends to drift over time and every tool loses accuracy to some extent. Calibrating and adjusting the tool will maintain its precision at the required level.
Storing the tool well when it is not being used is essential to keep it performing at its best. Tools should be stored in line with the recommendations in the user manual and kept away from damp environments or extreme temperatures.
If a tool stops working as it should, it’s all too easy to blame the tool itself. However, other factors such as the maintenance regime, air line system and calibration could be causing it to fail. Don’t overlook these: they are vital to keep a tool operating at its best.
Further information:
Chicago Pneumatic Expert Corner:
www.cp.com/en/tools/expert-corner

