ABSTRACT
Practical advice is given on getting the most the most meaningful and the most accurate information from machine vibration analysis, viz. on identifying the appropriate measurement locations and axes, the optimal data collection settings and the best analysis techniques. Also stressed are the importance of good reporting practices and the desirability of root cause analysis and acceptance testing.
INTRODUCTION
Vibration analysis is a fantastic field. For the analyst it is challenging and stimulating, and it should be rewarding. For the employer, it offers great financial rewards. But the question is: are you taking full advantage of the potential of vibration analysis? On the face of it, it can seem pretty simple. If you follow the set-up recommendations of the data collector vendor, and make sure that you mount the sensor on the bearing, then you will capture a spectrum that looks about right. It will have peaks and patterns which make it look like the spectra you see in the case studies. So you must be doing it correctly, right? Not necessarily.
Unfortunately it is very easy to think that you are doing everything correctly. The measurements look good, and you will see changes in the vibration levels and patterns if the bearings are damaged. But you have to ask yourself:
- Do you understand the machine you are testing?
- Are you getting an early warning of the fault condition?
- Are you able to detect all possible fault conditions?
- Are your measurements repeatable?
A LITTLE BIT OF BACKGROUND
The authors have been involved with vibration analysis for around twenty years. In recent years training has become a big focus, and we have developed material and courses that follow the ISO 18436 standard. We have had the honour of teaching some very experienced analysts: people who have been successfully performing vibration analysis for many years. We love the moment when the analyst says ‘Thanks, until now we have never really understood that’.
But the main point is that there has been a common theme among trainees – people have not understood the importance of measurement locations/axes, data collection settings (windowing, averaging, resolution, Fmax), analysis techniques (time waveform and phase analysis) and reporting practices. Many have left the course vowing to make changes to just about every aspect of their programme.
We don’t want to sound too critical. Firstly, if you have not received training, or you have only received the typical basic training, then how are you expected to understand these issues? Secondly, most analysts have tried hard to improve their diagnostic skills, and have set up their programmes with the best intentions, so any failings are not as a result of laziness or lack of effort. The fact is that most people do not receive sufficient training, and have so many responsibilities that it can be difficult to perform all of the analysis and fine tuning that is necessary.
THE ANALYST’S CHECKLIST
There is not enough time to go through all of these topics in great detail, but the following should give you something to think about. Are you –
- Collecting data from the correct measurement axes?
- Setting the correct Fmax and lines of resolution (LOR)?
- Setting the correct number of averages and overlap percentage?
- Using correct mounting techniques?
- Using additional technologies and special tests to confirm diagnoses?
- Generating reports to document successes and financial benefits?
- Performing root cause analysis and acceptance testing to improve reliability?
We will now take a closer look at each of these areas.
Collecting data from the correct measurement axes
As you know, machines vibrate vertically, horizontally and axially. Depending upon the orientation of the machine, the type of bearings, the orientation of components and the nature of the fault condition, the vibration pattern that best reveals the existence of the fault condition could be present in all axes but it may only be present in just one. If you are not measuring in that axis you may miss the fault.
Also, it is often very useful to compare the data from one axis with that from another (to compare levels or check for the existence of harmonics or sidebands). If you have attempted to save time by only measuring in one axis, this option will not be available to you. Of course, you can go out and re-test the machine to get data from additional axes, but then you will not have historical data to use as a basis for comparison.
Setting the correct Fmax and LOR
It is essential that you use the correct Fmax and LOR (lines of resolution). If the Fmax is not high enough you could easily miss important information. And if the LOR is insufficient, you will miss important detail.
You may be familiar with the following equation: Measurement time = LOR / Fmax. You can see that if you increase the Fmax the measurement will complete more quickly – and that is good. But as you increase the Fmax the effective resolution decreases – and that is not good. If you increase the LOR from 800 to 1600 or 3200 lines, the time to collect the data will double or quadruple. In the past we tended to use 400 or 800 lines because of memory storage limitations and data transfer rates. But those limitations no longer exist with modern data collectors and computers. You should therefore seriously consider changing to 1600 or even 3200 line spectra.
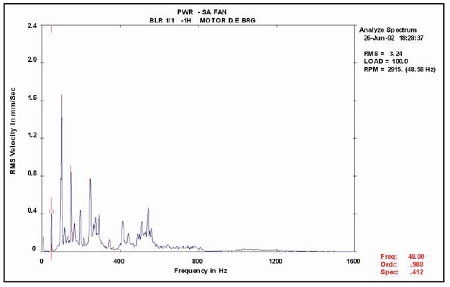
Here is an interesting example. In Figure 1 we have an 800 line spectrum with an Fmax of 1600 Hz. It looks like we have a high 2X peak – could that be misalignment? It also looks like the noise floor has been lifted.
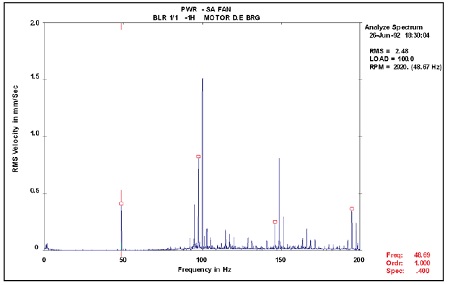
In Figure 2 the Fmax is only 200 Hz, and we have used 1600 lines of resolution. Guess what, we do not have misalignment after all. We have an electrical fault with the motor. We have a high peak at 100 Hz (the line frequency was 50 Hz) and there are pole-pass-frequency sidebands.
It is essential that the Fmax is set high enough to see all of the frequencies of interest (and harmonics of those frequencies), but it is also essential that you have sufficient resolution to correctly distinguish between those frequencies. The time record must be long enough to see five repeats of the lowest expected fault frequency. In most cases, the lowest fault frequency may be the slip frequency times the number of poles (electrical fault), or a cage frequency defect from a rolling element bearing. So, how exactly do you increase the time record without affecting the frequency span? Answer: increase the lines of resolution. Measurement time = LOR / Fmax.
Setting the correct number of averages and overlap percentage
Averaging helps us to achieve repeatability, and it ensures that we collect data while the machine goes through a number of cycles (rotations). We do not have the space now to describe in detail how overlap averaging works. However, here are two important points to consider, viz. data loss and repeatability.
Data loss: The Hanning windowing process ‘suppresses’ the data at the beginning and end of the time record – we may therefore lose important data. Overlap averaging ensures that this data will not be lost.
Repeatability (noise reduction): A higher overlap percentage and lower number of averages will reduce the required time to complete the measurement – which can appear (at first glance) to be an attractive option.
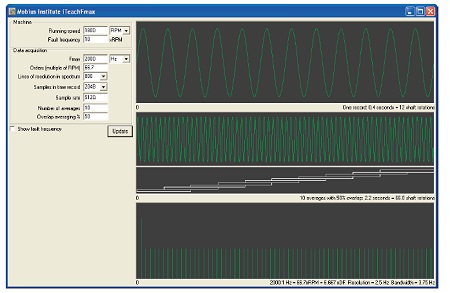
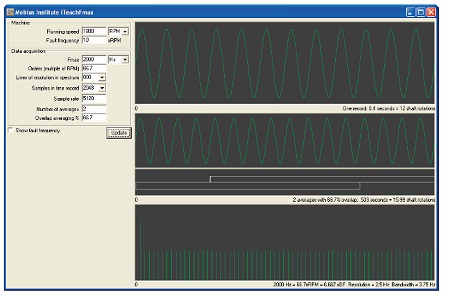
For example, a 2000 Hz measurement with 800 lines of resolution will require a 0.4 second time record. If we have ten averages with 50% overlap the test will take 2.2 seconds to complete, and the shaft will rotate 66 times (synchronous speed 1800 RPM), as illustrated in Figure 3. However, if we were to use two averages and 67% overlap, the test will now only take approximately 0.5 seconds and the shaft will rotate 16 times, as illustrated in Figure 4.
The questions you have to ask are –
a) Have you collected enough vibration data so that the random noise and vibration can be averaged together such that we have a repeatable test?
b) Has the machine gone through enough rotations during the time that you have captured the vibration data (visualise the rollers in the raceway, the gear teeth meshing together, etc.)?
Your vibration readings must be repeatable, and they must capture multiple instances of all the cyclical mechanical events. (Note that if you increase the lines of resolution you can afford to reduce the number of averages.)
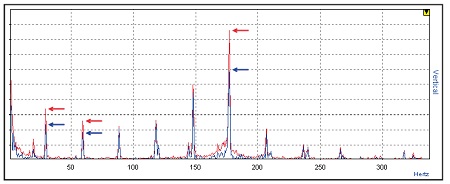
Try an experiment. Use your data collector and take a reading with your current number of averages and overlap percentage. Now repeat the test with a larger number of averages, and perhaps a lower overlap percentage. Now compare the two spectra. They should be almost identical if your initial settings were correct. Now repeat this experiment on a few machines: an electric motor, a compressor, and a gearbox. They will not be perfectly identical, but there should not be significant differences in the amplitude at the major peaks or in the noise floor. Figure 5 illustrates the results of such a test. The red spectrum (also indicated by the plot upper arrows) was the result of just three averages, while the blue spectrum (also indicated by the plot lower arrows) was the result of eight averages. If you watched the data in real time, you could see the peaks rise and fall.
This means that you could take a measurement today that looks like the blue spectrum, and in one month repeat the test to get a measurement that looks like the red spectrum. Imagine if you tried to compare these two measurements. You would incorrectly interpret the changes in amplitude as a fault condition. This example is real, but a little more severe than normal. Thanks to modulation, beating, and various sources of external vibration and noise, four or fewer averages may be insufficient.
So, rather than choosing default settings for all machines, or reducing the number of averages in order to save data collection time, please think carefully about each machine you are testing and try the experiment above. A little extra time spent during data collection will pay dividends.
Using correct mounting techniques for improved repeatability and frequency response
We just discussed repeatability in terms of setting the correct number of averages. But it is also essential that you mount the accelerometer correctly, and that you follow appropriate practices to ensure repeatability. There are really two key issues to consider: repeatability and the mounting surface –
Mounting repeatability
You must mount the sensor in the same place every time. Changes in location can cause the amplitude levels to change. If the same person always collects the data, then this is less likely to be a problem. Otherwise it is important to mark the correct test location, or better yet, add a mounting pad.
Sensor mounting
The most common problem is sensor mounting. It must make good solid contact with the bearing housing. High frequency sources of vibration are attenuated when they must cross air cavities (e.g. gaskets, grime, dirt, etc.). If you are performing envelope measurements (or ‘demod’, PeakVue, shock pulse, spike energy, HFD, or any other measurement that utilises high frequency data), your measurements can be greatly affected if you do not correctly prepare the mounting surface. You should prepare a clean, flat surface, and wipe it with a clean cloth if you work in a dirty environment.
A strong magnet is a minimum requirement, and stud-mounted sensors provide the best results. And, of course, avoid surfaces that may resonate at operating speeds such as motor end bell cowlings or guards.
Using additional technologies and special tests to confirm your diagnosis
Vibration analysis is great, and spectra can tell you a great deal. However, relying on the spectra that you collect routinely will not give you the whole picture. There are other data types, special tests and condition monitoring and performance data that will help you improve the accuracy and timeliness of your diagnosis.
Time waveform analysis
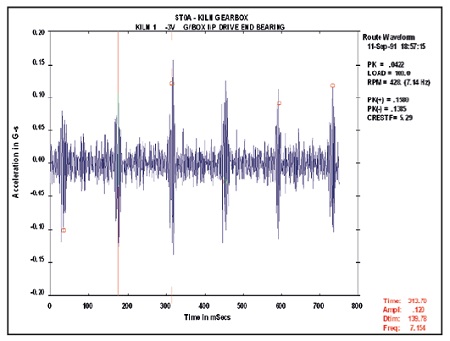
It is very easy to collect time waveform measurements, and you should use these measurements to help confirm the diagnosis. Time waveforms can help you rule in or out certain fault conditions. Impacts, rubs, and looseness can be seen clearly in the waveform. Diagnosis of misalignment, imbalance, and bearings faults can be aided by time waveform data. Time waveform measurements are essential when studying low speed machines and gearboxes.
Phase analysis

While you will not collect phase on a routine basis, phase readings are not difficult to collect and interpret, especially if you have a two channel data collector. Many fault conditions can be confirmed with phase data, including misalignment, imbalance, looseness, cocked bearing, bent shaft, and structural resonance.
You should therefore learn how to collect phase readings, learn how to interpret them, and then utilise this powerful tool to help diagnose faults.
Other condition monitoring technologies
You should take advantage of ultrasound, oil analysis, wear particle analysis, thermography, motor tests (on-line and off-line) and other condition monitoring and performance data. Each of these technologies can help you better understand the condition of the machine. In some cases, one or more of these test types will reveal fault conditions earlier than vibration analysis, or in some cases, faults will be revealed that vibration analysis is unable to detect.
You can adopt the technology yourself, hire a consultant who has experience with these technologies, or befriend the people/person within the plant who collects this kind of data. Don’t work in isolation!
Generating reports to document your successes and financial benefits
Do you do a good job? Do you do an important job? Of course you do. But who have you told recently? How well have you communicated? An analyst is only as good as his or her ability to communicate the highlights of the analysis and recommendations to follow, and the success of your programme can be determined by how well you advertise the benefits of your programme.
It is essential that you spread this message. Everyone must know of the financial benefits of your programme. You must determine how to report on this information within your organisation. If you detect that a bearing may fail and you correctly recommend that it be replaced, how much have you saved your company? You could argue that a catastrophic failure at night during production could incur huge costs: downtime, secondary damage, overtime, and so on. But if you claim £300,000 on every bearing fault that you detect, management will not take you seriously.
You have to come to an agreement with your management so that you can report on the benefits of your programme in a meaningful, believable manner. And then you must generate that report often.
Performing root cause analysis and acceptance testing to improve reliability
Some vibration analysts believe that their sole job is to detect and report fault conditions. But that is not true. Locked inside your vibration data (and other condition monitoring data) may be the reason why the fault occurred in the first place. It is great if you can report that a bearing may fail, but even better if you can say what caused the bearing to develop the fault (or why the machine is misaligned, out of balance, and so on).
You can report the fault and wait for the fault to develop again, or you can do your best to ensure that it does not happen again. Precision balancing and alignment, correct lubrication, acceptance testing (to ensure that machines are in good health when they are put into service) and other practices combine to improve the reliability of the equipment. Vibration analysis and the other condition monitoring technologies are still essential, but improved maintenance, purchasing and repair practices will ensure that machine life will approach the design life.
CONCLUSION
At the end of the day you have to set your own goals. You can take measurements as quickly and economically as possible and aim to detect the most common faults (hopefully) before the machine fails, or you can take more care, and run a programme that provides an earlier warning of a broader range of fault conditions.
ADDITIONAL READING
1. iLearnVibration, Award Winning Vibration Software Analysis Training Package
2. iLearnAlignment, Award Winning Alignment Software Training Package
3. Mobius Vibration Analysis Training Manual, 2006
4. Reliability Maintenance Solutions Ltd, Vibration Analysis ISO18436-2 Level 1 Training Manual, 2006
5. Reliability Maintenance Solutions Ltd, Vibration Analysis Pocket Guide, 2003
6. Reliability Maintenance Solutions Ltd, Vibration Analysis Wall Chart, 2001
For further information contact:
Dean Whittle,
Reliability Maintenance Solutions Ltd,
No. 42 Goldcrest Close, Longridge Park, Colchester, Essex CO4 3FN, UK;
Fax: +44 (0)1206 791917
Jason Tranter,
Mobius Institute,
280 Myers Road, Merricks North, Victoria, 3926, Australia;
Tel: +61 3 5989 7285;
Fax: +61 3 5989 7393;
Email jason@iLearnInteractive.com

